
Preparing Photoshop Files for Export to Spine
- Arman Harutyunyan
- Dec 27, 2023
- 6 min read
In this guide, we delve deep into the art of preparing and optimizing artwork in Photoshop to be exported to Spine using official PhotoshopToSpine script. From setting up your document with the right size to the layer organization and preparing character elements like the head, mouth, and body. Whether you're a seasoned professional or just starting out, these insights will help you out to prepare source files for Spine animator
Setting up the Document
Size
Photoshop document size is mostly overlooked. Most of the time art is being made big just in case, however when it comes to Spine it needs to be adjusted to avoid creating huge skeletons with scaled bones. It is not something blocking though, you can always export from Spine resizing the texture to your needs.
However skeleton size in the viewport will still be scaled and very uncomfortable to animate

While you can always lower the quality while exporting from Spine, you can never make the art bigger without losing quality. So make sure to find the biggest possible size of that character you might feature on the screen.
For example if the game is designed for mobile and tablets, use the iPad's highest resolution (2732x2048 pixels) as a benchmark. Resize your Photoshop document to this dimension and add your character, considering its largest possible size in the game. While it might appear smaller during gameplay, it could be larger in character view, so plan for the maximum size. Place the character in a 2732x2048 document, then trim as needed. This size is ideal for importing into Spine. You can still use original photoshop file for maybe marketing purposes but at least you can be sure you will never need higher quality shown animated in the game.
Origin Point
The Photoshop ruler origin corresponds to 0,0 in Spine. This helps you to position the skeleton in Spine. Just a heads-up: Photoshop saves ruler origin per session, so next time you open the document you will need to place it again. A handy tip is to put guides where you need the origin, so you can easily get it back next time

Organizing Layers
Masks and adjustments layers
When exporting with PhotoshopToSpine script, adjustment layers and clipping masks in Photoshop are automatically applied to corresponding layers without the need to individually apply or merge them with each layer
Rather than using masks for eyes, create holes in the face piece. The PhotoshopToSpine script can understand masks in Photoshop, but it only exports them as images and does not transfer the masking functionality to Spine
Blending Modes
Spine Supports only 4 blending modes. It will recognize blending modes on the folder or layer in Photoshop and automatically apply them to the slots
Normal corresponds to the Normal blending mode in Spine
Multiply corresponds to the Multiply blending mode in Spine
Screen corresponds to the Screen blending mode in Spine
Linear Dodge(Add) corresponds to the Additive blending mode in Spine.
Preparing Art Pieces
General Tips from Photoshop to Spine
Below I collected general tips that would improve animators life and overall animation quality
Straightening
Straighten soft pieces like hair or tentacles for better deformation in Spine

Note this is not mandatory but optional, some art should not straightened due to its extreme pose.

Reference
This suggestion is entirely optional yet greatly valued by animators. When an artist creates a character, they understand it best. Therefore, any extra sketches of the character's poses would be extremely helpful


Scene Composition
Seeing the scene composition where the character will appear is also beneficial. This provides insight into the environment and a sense of the final product. Animators can use this to render video files in that scene, rather than without any background
Layer Style
Avoid using layer style such as Drop Shadow, Glow or Stroke on a group of layers that are supposed to be exported separately. Apply these styles individually to each layer instead. For example this stroke is unacceptable if you plan to animate the spring or the handler. No, Spine doesn't have stroke or drop shadow feature

Preparing The Head
General Tips
Back side of the head if character should have 3D effect

Separate and expand the neck to avoid gaps while animating

Avoid baking hair shadow on the face

Eyes
Masking the Eyes
While spine has masking feature it is highly recommended to avoid using it whenever possible. This is the most common case to use masks and the best way is to cut holes on the face and hide pupils behind it
Glasses
It is very hard for animator to cut glasses from the face without having drawing skills. So please separate any glasses especially if they are transparent. Additionally having glasses separate helps with 3D rig of the head
Eye Reflections
Since reflections are not supposed to move with the pupils having them separate adds nice depth to the eye rig

Closed Eyes
Almost always animators need closed state for eyes. It allows the character not only to blink but also show some basic emotions. The easiest way to prepare just one closed state for eyes, or maybe make it two, fully closed normal and fully closed happy


For me personally merging the eyelids is the best way to go but it really depends on the animator, some just want to have more control and have upper and lower eyelids separated and some even like eyelashes to be separated

Mouth Structure
I would not recommend to separate mouth into pieces such as lips, tongue or teeth. It will take a lot more work to rig it and make it look not weird. However here is an amazing work done by Tsvetomir Filipov scroll down to see how he separated mouth pieces.
What I would suggest to draw several extra states of the mouth with all merged (teeth, interior and lips). This way you can switch states in the animation much faster also it will take much less time to incorporate that mouth into face 3D rig.

If you think switching mouth states is not smooth enough check this tutorial on Youtube to see how I rig a mouth for smooth transitions
Must have mouth states are normal and opened. With these two you can even do basic talking, but mostly you can show characters scream while attacking angry or winning in a happy state.
Additional states can be sad, saying O and angry closed(with teeth grinding). Almost every other extra state such as saying L or laughing can be achieved using above states
Preparing Body
Arms
Sometimes lower arm might go in front of the chest while upper arm is behind it. Cut the arm from the elbow so animator can have control over layering order


The best way to cut the elbow is a circular joint where both pieces overlap intersecting in a circle, in addition to that you can feather the edge of the hand a bit so the seam is not that obvious. Test it in Photoshop!

If you have multiple arms, use layer mask on a group to circle out them out, you will most likely be coming back to this mask later to refine it.

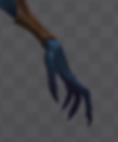
Hands
There is no exact way to approach this, as it largely depends on the art style. Typically, you would start with a Normal State pose, as shown in the image below. However, additional states may be necessary in some cases. Consider the following: If the art is detailed with smooth gradients, producing multiple hand states may not be worthwhile. In such cases, it's better to create one basic hand state and rig it flexibly to represent various states. For art with a more cartoonish style, consider drawing extra states and switching them in animate mode. Sometimes you have your character 3D model so you can easily render multiple states. Ultimately, the approach depends on the specific case. However be careful, you dont need to introduce new hand states if you can achieve them with your working rig. This will save space on the final atlas

With Normal state most important piece to separate is the thumb. Although you can separate the other fingers as well, isolating the thumb is crucial. Since the thumb moves differently from the other fingers and tends to overlap with the hand more frequently
There's no need to separate each finger into individual phalanges; one piece per finger is more than enough
Below are a few examples of smart separation


Last hand can go as a full piece since all the fingers have a clear separation and this hand won't be much active in the animations
Hips and Pelvis
Not much to say, if your character has a wide range of leg movements, like running or walking you will need to separate the hips and make sure pelvis has back layer to cover gaps, find an example of my recent rig below


Poleyn or Kneecap
Better to have it separated, it can cover all the gaps and seams on the knee

Feet
Most of the time you are good with one state for each foot, and the image for each foot almost always comes merged. However sometimes character is in different angle and bottom part of the shoe may be needed
