
[Intermediate] Rigging a face in Spine 2D for 3D turn
- Arman Harutyunyan
- Mar 24, 2023
- 2 min read

Updated: Aug 8, 2023

Hello and welcome to this tutorial! We're excited to have you here as we guide you through the process of rigging a face using 2 bones and one Transform Constraint that allows the second bone to move in the opposite direction. While this method may take a bit longer, it will produce better results in the end. However, if you're short on time, you can check the tutorial for Simple Rigging instead. Either way, we're confident that you'll come away from this tutorial with valuable knowledge and skills to enhance your animation projects!
Pros | Cons |
Very Popular: There are a lot of tutorials are available | Still doesn't rotate the head in 3D, just moves the face and back of the head opposite directions |
Still easy to do: 1-2 Hour | Requires more detailed mesh and more Vertex Transforms |

Create a bone/container for each head features
Example of head features are: Eyes, Mouth, Ponytail, Ears.

My suggestion is to not complicate things and bind eye or mouth vertices one by one. Instead put mouth or eyes inside bone container and move the bone instead using transform constraint setting face controller as a target. Believe me, most of the time if you bind the face mesh nicely just moving head features is enough, no need to also bind their vertices separately.
Create controller bone with reverse constraint
Create two bones inside the head bone one on the tip of the nose the other in the center of the back side of the head

Change the icons

Give them some colors

Create transform reverse constraint for back side bone

Create constraints for each facial feature that should be affected by controller
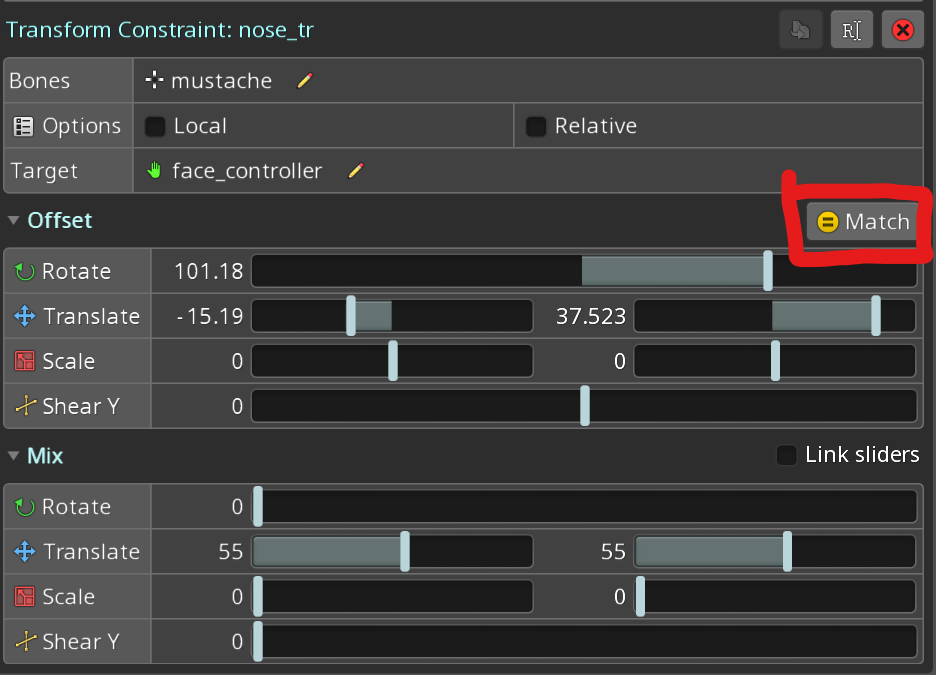
Instead of binding meshes of the head features we will move their container bones using transform constraints. That means you need to create one for them. Just hit match for now dont set any value, we will do it in animation mode
Animate simple left right motion to bind the meshes in test
Better if we bind the meshes in animate mode while checking the results realtime.
In animate mode, key the transform value of controller bone on the left side at 0 frame
Move the playhead at 10 frame and key the transform value of the controller bone on the right side
And finally copy 0 frame to 20 frame to make a seamless loop

Bind the meshes and test
Just bind those vertices :)
Set values for transform constraints
This is where we set values for constraints of the head features. Note that a key is being created. So make sure to set values at the 0 frame

Transfer the constraints values from animate mode to setup pose
At this stage you should already have fully functioning head 3D, however since we set constraints value in animate mode in setup pose controller will look broken. Make sure to transfer the constraints values to setup pose by just copying them
Tips
You can not only move the controller but also scale it to add an extra depth.
While moving face make sure to move pupils first to achieve natural motion. People tend to look before turning their head.


Comments